How do you write a children’s book and actually get it published?
You start by knowing who you’re writing for. You build in the elements that make little eyes light up. You add illustrations that bring the story to life. And then, you choose whether to self-publish or submit to a traditional publisher.
This article will give you the tools to finally write that story that’s been tugging at your heart — the one you’ve imagined sharing with children, but never quite believed you could finish.
What’s your reason for wanting to write a children’s book?
For me, it’s this smile.

That’s what started it all.
Maybe you’ve got a story idea that won’t let go. Or maybe there’s a favorite bedtime tale your child asks for every night, and you want to give it a permanent home on the page.
Whatever your reason, now’s the time to make it happen.
I’m a multi-award-winning and bestselling children’s book author, and I’ve had the joy of ghostwriting more than 50 children’s books. I also created something called Children’s Book University®, where I help authors bring their own beautiful books to life.
What follows is a condensed version of everything I wish I’d had when I was first starting out.
Let’s get started.
- How to Get to Know Your Audience
- How to Choose the Right Format for Your Children's Book
- How to Narrow Down Your Book Category
- How to Name a Children's Book
- How to Choose a Writing Style
- The Most Important Elements of a Children's Book
- How to Edit Your Children's Book
- How to Illustrate Your Children's Book
- How to Create a Book Dummy
- How to Sell Your Children's Book
- FAQs on Writing a Children's Book
Table of contents
- Questions to Consider Before Writing a Children’s Book
- STEP 1 . Choose the Format
- STEP 2 . Know Your Target Category
- STEP 3 . Choose a Title
- STEP 4 . Find a Writing Style
- STEP 5 . Incorporate Important Elements
- STEP 6 . Use Solid Characters
- STEP 7 . Make the Story Engaging
- STEP 8 . Proofread & Edit
- STEP 9 . Illustrate Your Book
- FAQs for Writing a Children’s Book
- 1. Should I copyright my children’s book?
- 2. What should I not do when writing a children’s book?
- 3. How do I convert my children’s book into an ebook?
- 4. Should my children’s book have a subtitle?
- 5. How do I write a children’s book description?
- 6. What category should my children's book be in?
- 7. What is the best cover design for my children's book?
Questions to Consider Before Writing a Children’s Book
Will parents want to buy this book?
Here’s the truth: When you’re writing for younger readers, you’re not just writing for them.
You’re writing for their parents, too.
They’re the ones holding the credit card. They’re the ones browsing Amazon or strolling through a bookstore. So while your story should absolutely captivate children, it also needs to appeal to the people buying it.
Most children’s books are purchased by women between the ages of 30 and 44. That’s your core audience, and it’s important to understand what they’re looking for.
A few ways to do that:
- Spend time with children in your target age range (and the grownups who love them)
- Join parent or teacher Facebook groups and observe what kinds of books get recommended
- Talk to friends or family who are raising kids
- Ask questions. Even a short survey to moms in your circle can offer surprising insights
Market research can help, too. It shows us exactly what parents are searching for when looking for books their children will love. Sometimes, the results are eye-opening.
Take a look at the table below to see how much search volume varies between common themes on Amazon:

Data provided by Publisher Rocket
As you can see, certain topics are in high demand… while others may be tougher to sell. That doesn’t mean you have to chase trends or ignore your heart — but it does mean knowing where your book fits, and what kind of response it’s likely to get.
Side Note: We recently reviewed another great course on publishing children's books, read our review here.
Do you know the [basic] structure of a children’s book?
Before you start writing, it helps to understand how children’s books are built.
There is a structure to them — even the ones that seem delightfully random at first glance. Whether you’re writing a 200-word board book or a 1,000-word picture book, there are common patterns you’ll start to notice once you study enough of them.
One of the best ways to learn that structure?
Start reading like a writer.
- Study books in your target age group. Pay attention to layout, sentence length, and vocabulary.
- Take a trip to your local library or bookstore. Browse the kids’ section and flip through dozens of titles.
- Look up publishing and reading trends. Slideshare often has helpful research on what’s selling and why.
- Talk to early childhood educators or child development experts. Their insights can help you understand how young readers learn — and what kinds of stories support that learning.
Is there a template for writing a children’s book?
There are templates out there for writing children’s books, but those are just starting points. Use them to guide your process, not box it in. Once you understand the basic framework, you’ll be free to bring your own voice, characters, and ideas to life on the page.
Here are some of my favorites:
- My own How to Write a Children’s Book Template (it’s free with lots of added resources)
- Template.net’s Illustrated Children’s Book Template (not all are free, but very professionally done with lots of different choices)
- Write Kids’ Books Free Microsoft Word children’s book template (for chapter books for slightly older kids )
- Claire O’Brien’s Free Picture Book Scrivener Template (for everyone’s favorite book-writing software, Scrivener)
- Used to Tech’s Free Editable Book Templates in Word (for Microsoft Word)
Can you explain your book concept before writing?
Before you dive into writing, ask yourself this:
Can I explain what my book is about in one sentence?
If you’re talking to a parent, a publisher, or even a curious friend… you want to be able to share your idea clearly and quickly. That’s where a logline comes in — a short sentence that captures your story’s heart and hook.
Think of it like this:
If someone gave you 30 seconds to describe your book, would they walk away excited? Or confused?
If you’re struggling to sum it up, your idea might still be too fuzzy. That’s okay. This is a great chance to tighten your focus before you begin writing.
Once your concept is crystal clear, the writing becomes so much easier.
Writing a Children’s Book: Things to Avoid
Here are a few things to watch out for as you write your children’s book:
- Mixing up age categories. A board book for toddlers shouldn’t use long words or complex sentences. And middle grade books shouldn’t include content meant for teens. Each age group has its own needs — keep those in mind from the start.
- Using too many words. If you’re writing a picture book, try to stay under 800 words total. That includes everything — even the dedication and author bio. Less really is more here.
- Making the lesson too obvious. Kids are smart. If your story feels like a lecture, they’ll tune out. Let the message come through naturally by focusing on the characters and their choices.
- Choosing a bland title. Your title should catch a reader’s eye and make it clear what your story is about. A subtitle helps too — it gives your book more visibility and helps with search engines like Google and Amazon.
- Writing flat characters. Children love vibrant, bold personalities. Make sure your main character is active, curious, and capable of making decisions that shape the story.
- Starting too slow. Begin your book with something that sparks curiosity — a question, a moment of change, or a problem to solve. You want kids leaning in from the first line.
- Settling for weak illustrations. The pictures are just as important as the words, especially in books for younger children. Invest in illustrations that bring your story to life — they can make all the difference when it comes to connecting with little readers.
Best Book Marketing Software
Over 47,000+ authors, NYT bestsellers, and publishing companies use Publisher Rocket to gain key insight to the market. Help your book now
Get Rocket NowHow to Write a Children’s Book in 9 Steps
You want to make a children’s book. Below is every resource you’re going to need.
Here is a step-by-step guide on how to write a children’s book:
- Choose the format
- Know your target category
- Choose a title
- Find a writing style
- Incorporate important elements
- Use solid characters
- Make the story engaging
- Proofread and edit
- Illustrate your book
STEP 1. Choose the Format
Should you publish an ebook or paperback? You should consider publishing your children’s book in both ebook format and paperback format.
Paperback is still the most popular format for children’s books. If you’re looking to sell your children’s book on Amazon or in brick-and-mortar stores, you should invest in a high-quality paperback format.
Ebooks are not a very popular medium for children’s books. However, children’s ebook usage is continuously increasing.
Most parents still prefer their kids to read print books, but the number of parents who prefer ebooks or who have no preference is growing.
Ebooks also come in handy during promotions and review requests. Giving away an ebook for review is a lot easier and more cost-effective.
With a little research, you can determine how well books are selling in your desired format. Here's an example of five competing paperback books on Amazon showing for the keyword “Children's Books About Puppies”, which should give you an idea of how well that format is performing. You can even see how many pages these books are, so you can calculate your estimated costs!

Price, Earnings, and Pages Data provided by Publisher Rocket
It’s worth noting that a study out of the University of Michigan found that storytime with ebooks is not as effective. Compared with physical book storytime, parents spent more time talking about the technology, instead of the book’s content, during ebook storytime.
So physical children’s books won’t go away anytime soon.
STEP 2. Know Your Target Category
To write a children’s book, you need to know your target category — that is, the age of your target audience.
When publishing on Amazon, you will be asked to list what ages your book is for. So it’s important to add the most appropriate age range. Otherwise you may receive lots of negative reviews from parents and other caregivers that thought your book to be unsuitable for their little ones.
Depending on the kids’ age reading your book, you will want to adjust the number of illustrations, word count, writing style, and more.
Most children’s books fall into one of these 5 categories:
- Board books
- Picture books
- Chapter books
- Middle grade chapter books
- Young Adult books
Below is a table to show average statistics for the most common types of children’s books:
Children's Book Categories
| Category | Age | Word Count | Pages | Illustrations |
|---|---|---|---|---|
| Board Book | 0-3 | 0 | 12-32 | Every Page |
| Picture Book | 2-5 | 200-400 | 32 | Every Page |
| Chapter Book | 6-10 | 3,000-10,000 | 32+ | Almost every page |
| Middle Grade Book | 8-12 | 30,000-45,000 | 80+ | 12+ illustrations |
| Young Adult Book | 13-18 | 60,000-85,000 | 150+ | Few if any illustrations |
Short words and short sentences are critical for the youngest children, so readers don’t feel overwhelmed. Colorful illustrations and fun characters are more necessary in children’s books than in adult fiction. Where adults can mentally grapple with ambiguity, kids prefer resolved stories and answered questions.
Each stage of development in a child’s life requires a different story structure and book setup. Adapting to each stage and its cognitive ability is essential if we want our book to be meaningful, educational, and fun.
Board Books
Board Books are considered the youngest category — including on Amazon’s marketplace. They are for kids aged 0 to 2.
A Board Book is printed on thick paperboard. Often, it contains all pictures or fewer than 100 words.
In most of these categories, but especially these Board Books, marketing to parents is probably more important than appealing to kids. Of course, you want your book to be fun and intriguing to children. But make sure you give parents what they’re looking for: a good message and subtle, effective education.
Picture Books
Picture Books are the next category of children’s books. They are for 3- to 5-year-olds.
Children’s picture books contain up to 400 words, but there should still be vibrant illustrations on every page.
Chapter Books
Also called the “Early Readers” category, Chapter Books are just what they sound like — the first books that children will read with the story split up into chapters.
Though some children will be excited to start reading chapter books, others will be reluctant. The broad age range for basic Chapter Books is 6 to 10.
Middle Grade
Middle Grade books are for children 8 to 12 — a step up from Chapter Books.
These books typically feature a protagonist aged 10 to 13, slightly older than the reader. They should contain no profane language, no violence, and no romance outside of a first kiss or an innocent crush.
Common themes include friendship, acceptance, good conquering evil, and the importance of family.
A Middle Grade book is longer than a Chapter Book but shorter than a YA book. It usually contains between 30,000 and 45,000 words.
Young Adult
Young Adult books are targeted towards readers aged 13 to 18. Abbreviated as YA, Young Adult is meant to appeal to teenagers, although it’s important to note that more than half of YA books sold are read by adults older than 18.
Some people also use “Young Adult” to mean a genre where the protagonist doesn’t fit in, the parents are absent, they live in a post-apocalyptic world, and a coming-of-age story takes center stage. These are tropes and don’t necessarily apply to every YA story, but you get the picture.
YA books won’t always be considered children’s books. But some traditional publishers may classify “Young Adult” as a children’s book category.
STEP 3. Choose a Title
You need to choose a winning title for your children’s book. You could do this after it’s written, but having a title in mind may guide you in your writing. You can always improve and change the title after the story is written.
A creative title lets your story’s personality shine through. But you also want readers to actually find your book. This could be difficult if you don’t name your children’s book correctly.
Fortunately, Dave at Kindlepreneur wrote excellent articles on How to Title a Book and Book Title Generators. They will definitely help you craft that perfect title.
To title a children’s book, you need:
- To grab a reader’s attention (or a parent’s attention)
- To clearly tell what the story is about
- An easily searchable title, hard to confuse for something else
- Keywords that match what your audience is searching for
The book The Color Monster: A Story About Emotions is a great example:
- It grabs your attention because kids usually don’t associate monsters with different moods.
- It tells parents and kids that this story is about different monsters with different emotions.
- It is one of the first results when you search “monster book for kids.”
- It has the word “monster,” a very common search term for boy’s books.
- The subtitle reads “A Story About Emotions,” and includes “emotions,” which is another common keyword parents look for in their children’s books.
Speaking of subtitles: It’s important to include a subtitle underneath your title. This helps the marketing of your book by including additional keywords that parents can search for.
As you can see, some kids book genres have decent money coming into them, with less competition. So, make sure you do your research beforehand and see what possible types of kids books you can create. One way you can quickly see the competition of a genre is checking out your book's Amazon categories, and seeing how many sales it takes per day to become a bestseller. That should give you a good idea of the competition in that genre.
For example, take a look at the competition difference here for several children's categories about specific animals. Many young children have a favorite, and making a high quality book in a lower competition category can help your book be discovered by readers.

Data provided by Publisher Rocket
By writing a quality book for a category with low competition, but significant interest, your children's book will stand out from the crowd. If you decide to target a high competition category, just know there are publishers and authors with high experience already in that space, and you will have to work harder to capture a customer's attention.
STEP 4. Find a Writing Style
You need to find a writing style that fits the age group you are writing for, the associated word count, the story you’re telling, and your own preferences.
You may be an excellent writer, an engaging blogger, maybe even an already accomplished author of adult fiction or nonfiction. But when it comes to writing style for children, you have to adopt a new mindset and an appropriate writing style.
Here are some writing styles you should consider:
- Rhyme: If you decide to write your book in rhyme, you need to make the rhyme very, very good. Make sure lines have the same syllable counts and rhythms. Don’t force bad rhymes or skip rhyming. Be consistent. (The Little Blue Truck and Llama Llama books are excellent examples.)
- Past or Present Tense: Kids prefer books in the present tense, actively engaging them in the story. They’re experiencing it as it happens, rather than being removed from something that happened in the past. (Maisy books are a great present-tense example.).
- First or Third Person: A third-person narrator’s voice may give you more freedom and flexibility. Children tend to prefer it to the first person. However, if it works with your theme to tell the story through a first-person narrator’s eyes, then make that choice.
There is no right or wrong approach; it’s merely a question of style. Once you have chosen your style, you will need to stick to it throughout the book.
STEP 5. Incorporate Important Elements
When you write a children’s book, there are important elements that you need to incorporate, such as an appropriate theme, memorable characters, and relatable dialogue.
Your inspired story idea is only as strong as how you tell it. There’s a beginning, a middle, and an end. There are actions, scenes, and emotions. Be sure to be clear about your core message.
The 5 most important elements in a good children’s book:
- Unforgettable characters: The best characters have strong personalities, make bold moves, and go after their dreams against all odds. Children fall in love with them and want to be like them. Children want to relate to the main character in some way. They also relate to kids that are just a bit older than them. Characters who remind kids of themselves are the most unforgettable.
- Suspenseful action/hook: Beginning a children’s book with a suspenseful action or hook is an effective way to draw in young readers. Consistent action throughout your story is vital, as it will hold the reader’s attention. Chapter books, for example, usually end each chapter with a cliffhanger to ensure the reader keeps turning the pages.
- Realistic dialogue: Children like to read stories that sound like they talk. Listen to conversations you hear around you; none of them will sound like the nicely flowing, full sentences you learned to write in school. Make sure you’re using age-appropriate language that kids will understand and relate to.
- Good storyline: A good storyline means there are always obstacles and challenges for your characters, ever-escalating the action. Note that little ones like happy endings and answered questions. If your storyline lacks a happy ending, you risk upsetting the reader or leaving them dissatisfied.
- The instant recall factor: You want your book’s character to remain in the minds of your little readers long after they’ve read your book. If kids ask to read it over and over again, you can consider your story a success.
While the sequence and rhythm of events are significant, keep in mind that not all stories have the same structure. There is no one formula because following a formula would rob stories of their true potential.
Yes, it’s crucial to have an intentional structure. But if it doesn’t fit perfectly, don’t force it.

STEP 6. Use Solid Characters
You have to use solid characters in your children’s book. Interesting, unforgettable characters are a must, especially when helping kids recall your story and core message.
The best characters in children’s books…
- are around the age of the child, if not a few years older
- have colorful personalities
- make bold choices that move the story along
- speak as the readers speak (dialogue style)
- have relatable wants and dreams
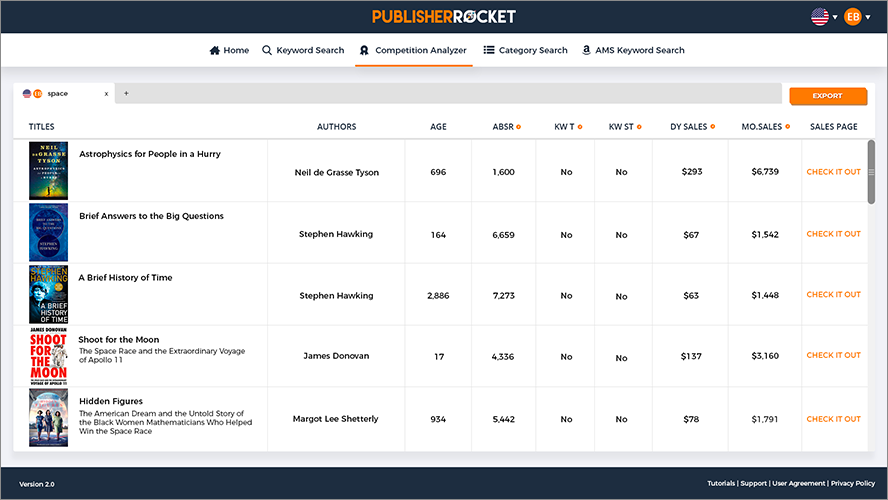
It's also important to research a character's surface level attributes before starting to write your book. Children will often ask their parents for a specific type of character such as a train, or a pig, or any other current interest they may have. For example, take a look at how much bestselling books earn for these character types, as well as the level of competition become a bestseller:

Data provided by Publisher Rocket
STEP 7. Make the Story Engaging
You need to make the story engaging in your children’s book.
First, you need a good ending. Younger kids need a happy ending that satisfies them. You don’t want to make a kid cry because your story ended sadly. That doesn’t mean slightly more realistic conclusions are pointless, but your audience may struggle to understand complex topics.
Next, make sure your main character is making deliberate choices to move the story forward. If they aren’t making any decisions, they probably shouldn’t be the main character.
Any good story needs suspense, no matter your age category. Cliffhangers are a great way to engage your reader. In a younger book, a cliffhanger may be as simple as writing “Peek-a-” on one page, then “BOO!” on the next.
Here are some examples of suspenseful questions that different age ranges should ask throughout the story:
- In your picture book, is the caterpillar going to achieve its dream of becoming a butterfly? Is the mama cow going to find its baby calf?
- In middle grade books, is the girl going to get her first kiss? Is the boy going to convince his parents to let him get the big Nerf water gun?
- In YA books, is the protagonist going to realize she’s beautiful and save the world?
STEP 8. Proofread & Edit
When you finish your first draft, you need to proofread and edit your children’s books.
Check out Kindlepreneur’s useful article on the Best Proofreading Services You'll Ever Find.
You should wait to hire a professional editor until you have self-edited your book. But you need a pro to look at your work before publishing.
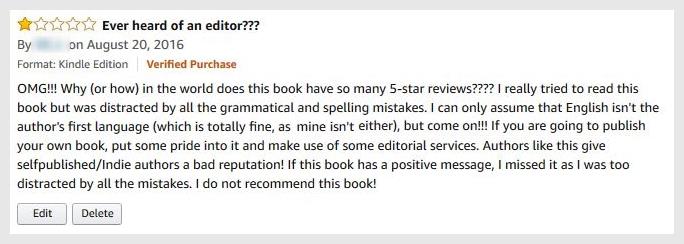
Editing is a valuable and necessary investment, particularly for anything longer than 600 words. A professional proofreader or a line editor can help with spelling and grammar. For chapter books and beyond, you may want to hire a developmental editor to look at the big picture.
A good editor is instrumental in making your book a success because poor spelling, grammar, and book structure will reflect poorly on you as a children’s book writer, leading to negative reviews and fewer sales.
Your book and its message might be fantastic, but too many errors will be noticed by your readers. They may voice their opinion in a review like this, which ultimately lowers your overall rating.
So if your book is more than 600-800 words long, you should send it off to a professional editor for proofing.
Yes, you can go over it yourself and let your significant other read through it. But letting an unbiased, independent professional look over it will make your manuscript as good as it can be.
To find a great editor, read Kindlepreneur’s handy article Selecting The Best Book Editor.
STEP 9. Illustrate Your Book
When it comes to adding illustrations to your children’s book, there are three options you can choose from:
- Do it yourself
- Hire someone
- Combination of both
The best option for you will depend on your budget, time, skill level, and trust you’re willing to put into someone else's interpretation of your story.
Illustrating your book may take almost as much time as — if not more time than — actually writing the words of your children’s book.
I’ve broken up the illustration process into 7 steps:
- Choose your orientation
- Plan your image sizing
- Create a storyboard/book dummy
- Combine text & illustration
- Choose an illustrator
- Pay for illustrations
- Obtain your illustrations
1. Choose Your Orientation
When it comes to picture books, there are 3 orientations to choose from:
- Vertical
- Horizontal
- Square
(This doesn’t apply to chapter books or books for older children. Those usually feature the classic 5½” x 8” format.)
You should choose your book’s orientation early on since it will inform virtually every decision about illustrations down the road.
This is not a hard and fast rule, but here are general reasons to choose each:
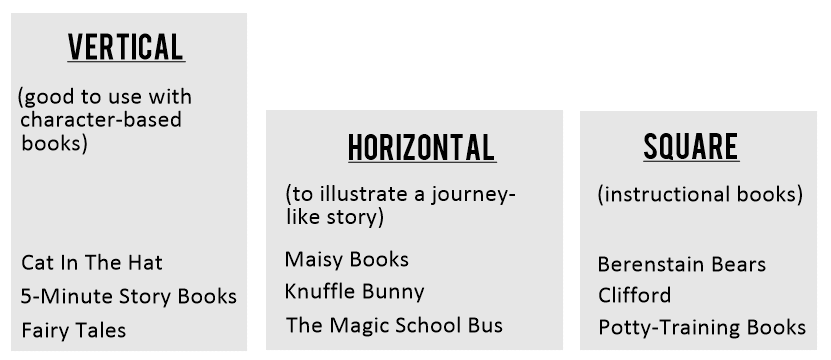
- Vertical images are great for character-based books
- Horizontal images are best for a journey-like story
- Square images are excellent for instructional books
2. Plan Your Image Sizing
Whether you hire an illustrator or create the illustrations yourself, you’ll want to make sure you plan your image sizing correctly. This way, once you upload your artwork, everything runs smoothly.
Below are the most common sizes for children’s book images:
- 5.5” x 8.5”
- 6” x 9”
- 6.14 x 9.21”
- 7” x 10”
- 8” x 10”
- 8.5” x 8.5”
- 8.5” x 11”
If you plan on having your images cover the entire page, make sure to add 0.125” to the top and bottom, as well as one side. This accounts for trimming (sections to be removed in printing).
Amazon offers handy templates to plan your image sizing. But remember that you’ll still have to add the bleed allowance yourself.
Here are great inches-to-pixels and pixels-to-inches converters. These help you know how large your image should be, depending on your selected trim size. Be sure to choose a DPI (dots per inch) of 300 when using the mentioned converter.
3. Create a Storyboard/Book Dummy
A storyboard or book dummy helps you decide what to include in each illustration and how the text will match up with the images.
This is meant to help you determine which illustrations you want to include, better informing your quest to find and hire an illustrator. This step is extra helpful if you are planning to create your illustrations yourself.
The storyboard creation process doesn’t have to be perfect. Be expressive, and have fun. In the end, you’ll probably create a few different versions, each being an improvement over the previous one.
How to create a storyboard or book dummy:
- Fold enough blank sheets of paper and staple the stack down the middle.
- Print out your manuscript on a separate paper.
- Cut and paste each block of text into the book dummy (folded paper).
- Flip through each page, read your pasted text, and think of an illustration that would go nicely with that particular text.
- Start sketching on the page of pasted text — or on the opposite page if that’s more helpful. Then you can visualize everything before you give your work to an illustrator.

4. Combine Text & Illustration
How you combine your text and illustrations is entirely up to you.
However, it's a crucial element on how to write a children's book. Whatever you choose, be consistent throughout.
There are two ways of combining text and illustrations:
- Text as part of the image
- Text and image separate
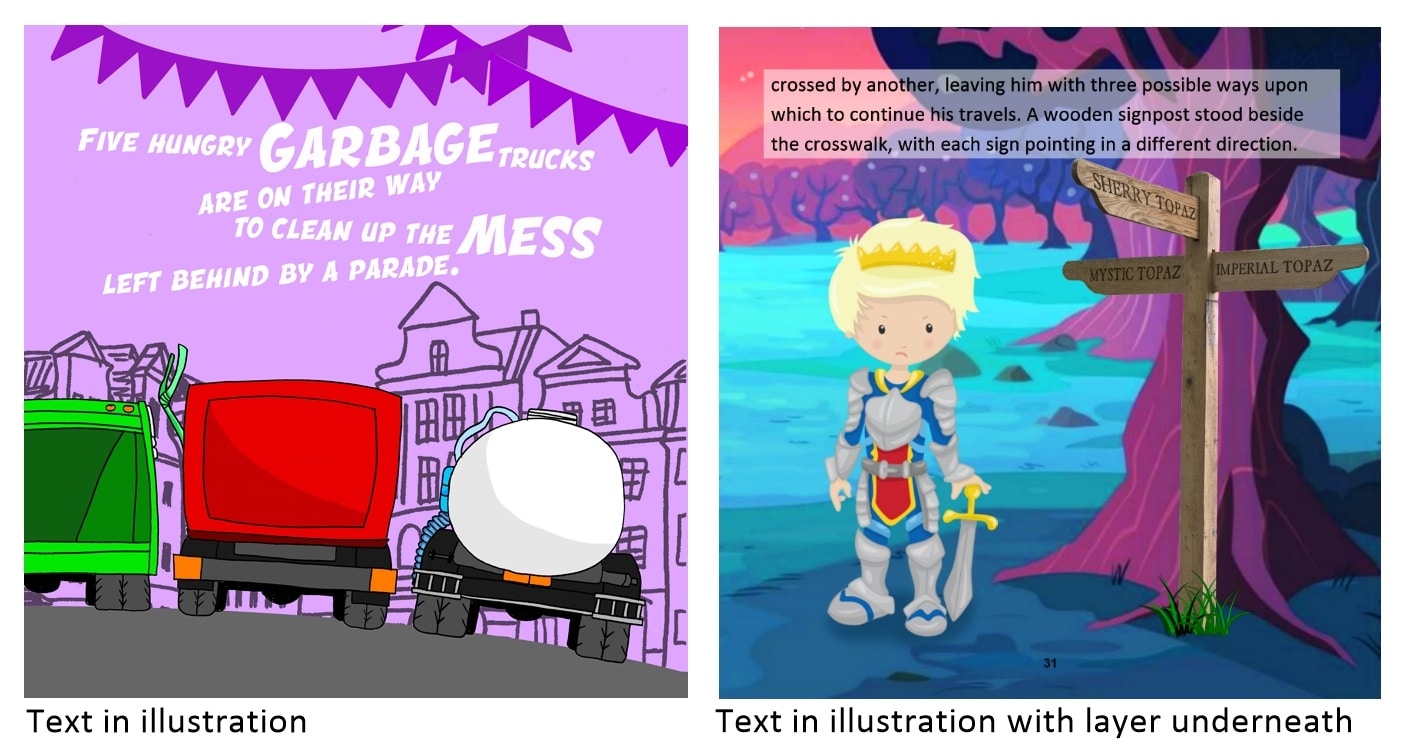
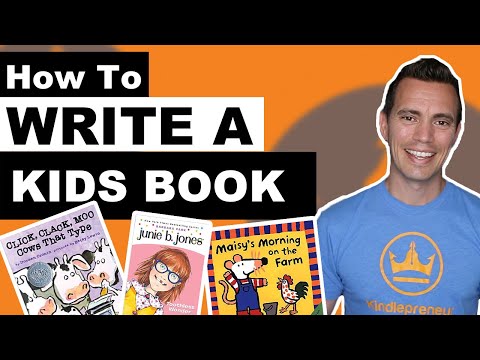
Text as Part of the Image
Having the text as part of the image makes your book format much more straightforward,, and looks consistent across all devices.
However, you decide to include the text in the image itself, this will have to be done by your illustrator. This method makes editing the text a bit harder — any changes or corrections have to be made within the image itself.
Below (left) is a page from my book The Garbage Trucks Are Here, and on the right is a page from my book A Gemstone Adventure.
Text and Image Separate
The other option is to have the text and image separate. The text sits below or above the illustration or on a separate page.
Below is a double-page spread from my chapter book series, The Amulet Of Amser. It has an image on the left-hand page and the text on the right-hand page.
You can arrange this layout by yourself. You don't have to involve your illustrator.

5. Choose an Illustrator
I've started gathering individual authors and agencies into one big list to help with your search. Check them and their sites out below. Keep in mind that I haven't used these services myself.
| Illustrator | Specialties |
|---|---|
| Evgenia Malina | Fiction and non-fiction for children, educational, colored, or black and white. Audience age - 6+ |
| Andy Catling Illustration | Picture books, YA books, Book covers (various) |
| Jennifer Nelson Artists, Inc. | Variety of specialties – they represent 15 artists worldwide |
| Izabela Ciesinska | Adorable characters, whimsical, commercial |
| Alison Mutton, Alene Illustration | Children’s illustration for picture books, chapter books and covers, in modern, fairytale, low fantasy or historical settingschildren’s illustration for picture books, chapter books and covers, in modern, fairytale, low fantasy or historical settings |
| Dave Hill | Picture Books, Chapter Books, Cover Design, Dummy Book Production |
| Artus Creative | Cartoon Illustrations |
| Wertheim Illustration | Fiction and non-fiction children’s picture books and book covers, realistic, animals and people |
| Bill Ledger Cartoon Studio | 3D and 2D illustration for children’s books and commercial projects |
| Kristy Lankford | Specializes in early childhood and elementary-aged publications, but not opposed to YA as well. Uses mixed media materials that include watercolor, ink, color pencils, gouache, and digital software. |
| John Peter Meiring | Children book Illustration, comics, and graphics |
| Beehive Illustration | Represent over 150 illustrators worldwide. Specializing in children's illustration. |
| Dan Ungureanu | Children's book illustration, editorial illustration |
| Zoe Ranucci | Children’s picture book illustration, layout and design, and character development. Strives to infuse projects with diversity, happiness and positivity. |
| Priscilla Kim | YA covers, primarily fantasy, modern and horror |
| Marty Jones | Realistically-styled illustration |
Here’s a list of outsourcing sites and social media sites where you can choose an illustrator for your children’s book:
- Upwork
- Fiverr
- Guru
- Freelancer
- LinkedIn — artist and illustrator groups
- Facebook — artist and illustrator groups
- Goodreads groups
- DeviantArt
- Children's Illustrators
These outsourcing sites provide you with reviews from the artist’s previous clients and may even include information about previous completion rates. Most importantly, these sites are cost-effective.
On most outsourcing sites, you’ll post your project (similar to a job offering), and children’s book illustrators will bid on it.
To get an idea of how much you should be offering, browse some of the platform’s current projects. Know that your bid sets a baseline only, as each illustrator will bid individually on your project if he or she is interested in working with you.
After the initial bidding process (usually a couple of days), you will have to go through each illustrator’s profile and portfolio to decide who would — or wouldn’t — be a great fit.
- Here’s a helpful vetting process to see if an illustrator is a good fit:
- Look at their profile and read through previous reviews.
- View their portfolio to get a feel for their style.
- Request a sample of their work to see how effectively they can turn your writing into illustrations and how well they follow instructions. View an example of such a request with this link.
6. Pay for Illustrations
You’ll need to pay for illustrations. An illustrator is more critical than an editor for picture books — the illustrations are what the reader will be most focused on.
To get a feel for acceptable prices for a project, browse websites to find postings for similar projects. Actual prices differ significantly from service provider to service provider and change drastically over time.
Payments are generally released based on milestones that you set, such as the completion of the storyboard. The milestone setup will depend on the scope of your project and the platform you are using to hire your illustrator.
The cost of your illustrator depends on multiple things:
- Number of illustrations
- Complexity of the artwork
- Illustrator’s skill level and experience
- Location of the illustrator
- Delivery speed
7. Obtain the Illustrations
Once you choose the best-fitting illustrator for your project and they’ve completed their work, you need to obtain the illustrations.
You want high-resolution images (300 dpi) with the proper sizing and the raw files of all images. This will enable you to make changes directly to your illustrations if need be.
A signed art release form is relevant if you decide to hire an illustrator directly. Any art attained via outsourcing sites should automatically make the illustrations your intellectual property.

Need Help with Your Keywords?
Take my full featured video course on how to select the best keywords and categories for your book.
Take the CourseFAQs for Writing a Children’s Book
1. Should I copyright my children’s book?
The answer to whether or not you should copyright your children’s book is entirely up to you. Just know that under U.S. copyright law, you already own your work the instant you write it down. However, you can protect your copyright by registering it with the US Copyright Office.
Read Kindlepreneur’s handy article written by a lawyer: How to Copyright a Book in the US
What should I not do when writing a children’s book?
2. What should I not do when writing a children’s book?
You should try not to sound too preachy or instructional about your themes and morals. Kids are very perceptive. They smell an agenda miles away.
You should not leave a story unresolved or a question unanswered. Depending on the age group you’re writing your children’s book for, you need to provide a satisfying ending — particularly for smaller kids.
You should not break patterns. Children love a routine. The key to routines or patterns is to not break them. In your children's book, once we’ve established a pattern (rhyme, repeating phrase, character behavior, etc.), try your best to stick to it.
3. How do I convert my children’s book into an ebook?
One of the easiest ways to convert your children’s book into an ebook is Amazon’s Kindle Kids’ Book Creator.
While I use other methods, I love working with and recommending this simple yet powerful tool. It’s FREE and helps you create an ebook version for your illustrated children’s book. You can import artwork, add text, and create Kindle Text Pop-Ups.
And the best part is that there’s no HTML/CSS knowledge required!
4. Should my children’s book have a subtitle?
Yes, your children’s book should have a subtitle, mainly for marketing purposes.
As I share in my book How To Self-Publish A Children’s Book, making use of a subtitle can be very beneficial for connecting with potential readers.
Giving your children’s book a subtitle provides you with an additional opportunity to use keywords, key phrases, or synonyms that potential readers might be using when searching for a children’s book like yours.
Using a subtitle also allows for more creative freedom than with your actual title. So if your title itself doesn't fully communicate the topic of the book, you’ll have the subtitle as a backup.
Figure out what is trending in children's books using Publisher Rocket. Use this info to develop an effective subtitle.
Just type in a children's book idea, and you can quickly see how many people are searching for those books on Amazon, the average amount of money made by the top books, and even the competition:

As you can see, some kids’ book genres have decent money coming into them with less competition. Make sure you do your research beforehand and title/subtitle your children’s book accordingly.
5. How do I write a children’s book description?
You write a children’s book description (blurb) by looking at similar books’ descriptions. Pay special attention to length, word choice, and the style they are written in. That’s usually a great way to see what your audience expects and is used to.
Like books of other genres, your book description is fundamental to your children’s book’s success.
While your book cover and title help with your book’s discoverability and grabbing a potential buyer’s attention, your description is often the reason a reader decides to buy (or not to buy) your book.
To help you with your blurb format, be sure to check out Dave’s amazing Book Description Generator that takes care of all the text formatting for you.
6. What category should my children's book be in?
Amazon has over 450 paperback and 260 eBook categories for children’s books. Your children’s book should be in the category that best describes your audience:
- Board Book — 0-3 years old
- Picture Book — 2-5 years old
- Early Reader/Chapter Book — 6-10 years old
- Middle Grade Chapter Book — 8-12 years old
- Young Adult (Teen) Chapter Book — 12-18 years old
(These categories are how Amazon’s marketplace categorizes children’s books.)
During your children’s book setup, you may have noticed that not all children’s book categories are offered as an option. That’s because some of Amazon’s categories need to be unlocked before being selected.
However, if you set up your children’s book correctly by adding age ranges, you will be able to add your book quickly and easily to any of these hidden categories by following Dave’s steps in his article How To Choose the Best Book Categories. This is a game-changer for you and your children's book.
7. What is the best cover design for my children's book?
The best book cover design for your children’s book is one that entices potential readers, looks professional to parents, looks fun to kids, and communicates what your book is about.
To get the best cover design you can for your children’s book, follow this guide for making standout book covers. Then create a book mock-up for your book marketing efforts.
8. How long should a children’s book be?
That depends entirely on the age group you’re writing for.
Board books usually have between 50 and 300 words. Picture books range from 300 to 800 words. Early readers and chapter books stretch further, typically from 1,000 to 10,000 words, depending on the level.
What matters most isn’t the word count, but whether your story feels complete and age-appropriate. Keep your readers’ attention spans in mind, and don’t add more than the story truly needs.
9. Do I need to hire a professional editor?
Yes, especially if you plan to self-publish.
A professional editor can help catch things you might miss. They’ll ensure your manuscript flows well, fits your target age group, and avoids common mistakes that can turn off young readers (or their parents).
This doesn’t mean you need to spend a fortune. But if you want your book to shine, a good editor is a smart investment.
10. Can I write a children’s book without illustrations?
Technically, yes. But illustrations are a huge part of most children’s books, especially board books, picture books, and early readers.
Illustrations help bring your story to life. They give children context, color, and visual interest. If you’re writing for older age groups (like middle grade or young adult), illustrations may not be necessary. But for younger kids, they’re often essential.
11. Do I need to rhyme my children’s book?
No, you don’t have to write in rhyme, but if you do, make sure it’s done well.
Children love rhythm and repetition. But forced rhymes or awkward meter can make a story harder to read aloud (which parents will definitely notice). If rhyming comes naturally to you, go for it. If not, simple prose is just as powerful.
12. Should I include a message or moral in my story?
You can, but let the story carry it.
Children’s books with a deeper message often resonate more, especially with parents. But that message should feel natural — woven into the plot, not delivered as a lecture.
The best stories show rather than tell. If you can craft a meaningful journey without spelling everything out, that’s the sweet spot.
Now you know how to write a children’s book!
You’ve got the steps. You’ve got the tools. Now it’s time to begin.
Follow this guide, and you’ll be able to craft a beautiful story that speaks to your audience — paired with illustrations that bring the pages to life.
Remember, there’s no single way to write a children’s book. No one right way to draw, or rhyme, or share a story.
What matters most is that it comes from you.
Your voice. Your vision. Your way of seeing the world.
That’s what children connect with. That’s what makes your book stand out.
So don’t hold back.
Tell your story. The world is waiting for it.
Check out my book, How To Self-Publish A Children’s Book – Everything You Need To Know To Write, Illustrate, Publish, And Market Your Paperback And Ebook.
It will teach you how to:
- Format Your Paper & Ebook Versions of Your Book Step-by-Step
- Publish Your Paperback and Ebook
- Market Your Freshly Published Children’s Book
Writing a children’s book is one thing; writing a children’s book that sells is another. Check out Kindlepreneur’s video on How to Write a Children's Book: 8 EASY STEPS!
Want more videos like this? Then click HERE to subscribe to Kindlepreneur’s YouTube channel.